| Interface Features |
| Options Menu |
|
Selecting a user's name and then right-clicking on it in any of the OnLAN Messenger main window (Pic #1) tabs (except for the "Personal" tab) will bring up the options menu. (Pic #3) This also works in the "Birthdays" (Pic #10), "Message" (Pic #15, #29), "Send message" (Pic #28) and "File" (Pic #31, #33) windows. 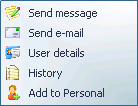 Pic #3 Some options may be greyed out, depending on the rights setup by the system administrator for your user profile, as well as the type of contact you selected (OnLAN Messenger user or e-mail contact). E.g. the option "Send File" will be greyed out for an offline user. "Send Message" and "Send File" options will be greyed out for e-mail contacts. Options menu functions: "Send Message" - opens the "Send Message" window, where the selected user's name will be filled in the "To:" box. "Send E-mail" - this will load your default e-mail client, and the selected user's name will be filled in the "To:" box in the Create e-mail message window. "Send File" - sends a file to the selected user. "User Information" - opens a window containing user information that is stored in the OnLAN Messenger database (Pic #4). The IP address information is only available to OnLAN Messenger administrators. 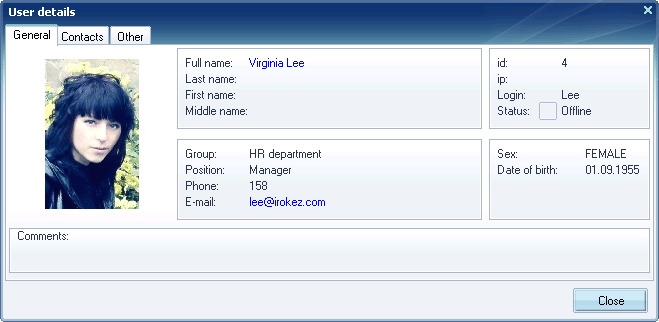 Pic #4. "History" - opens the history of your conversation with the selected user. "Add to personal" - adds the selected user to your personal contact group. Selecting and right-clicking a user name in the "Personal" tab of the OnLAN Messenger will open a slightly different options menu. Instead of the "Add to personal" option you will see two new ones: "Remove" (active, if a personal contact or group is selected) and "Remove contact group" (active, if a personal contact group is selected). Clicking "Remove" will delete the selected contact (or contact group) from the personal list. However, the user information remains in the OnLAN Messenger database, and you can still send messages to the user by means of the "All" tab. Selecting "Remove contact group" will remove all users in the contact group from your personal list, but their information will be stored in the OnLAN Messenger database. Selecting and right-clicking a user's name in the "All tab of the "Send Message" window (Pic #28) will open an options menu, as shown on Pic #5. This menu has a new option "Add selection to personal". This allows you to move all the selected users in the "All" tab to one of your personal contact groups. This is done in the exact same way as described in the "Personal contact groups" chapter of the manual.  Pic #5. |