| User Interface |
| Main Window |
|
TheOnLAN Messenger main window contains four tabs: "All", "Online", "Personal", "My group". An example of what the main window looks like with the "All" tab open is displayed on pic 1. 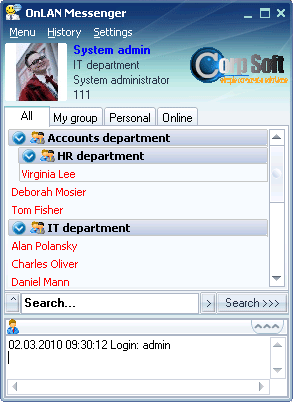 Pic. 1 The "All" tab contains a list of all users, sorted according to their designated groups. The "Online" tab contains a list of all users, who are currently connected to the network, i.e. users at their workstations with their computers turned on. All users are sorted according to their default groups. The "My group" tab contains a list of users and e-mail contacts grouped into one default group, which you are part of, in the OnLAN Messenger database. The "Personal" tab contains your personal group of contacts. You can create and modify this list as you wish. Selecting any OnLAN Messenger user or e-mail contact in the main window, and then right-clicking on their panel, will bring up the options menu. You can access the OnLAN Messenger functions menu by clicking on the "Menu" button in the main window. Clicking on the "History" button allows you to see the log of all incoming and outgoing messages and files sent by means of the OnLAN Messenger. Click on the "Settings" button in the main window to bring up the OnLAN Messenger user settings. The search bar is located under the "Menu", "History" and "Settings" buttons. You can utilize it to find a particular user, who you wish to send a message to. The following search filters can be used: - name or part of the name; - ip-address in the following format: ххх.ххх.ххх.ххх; - login name; - phone number (using the format applicable to the given database); - e-mail; - position; - sex (male, female); - date of birth (dd.mm.yyyy); - description. Keep in mind that the availability of the filters is dependant on the registration information given by the users, therefore not all filters will apply to each and every user. Contact your OnLAN Messenger administrator to get a list of relevant filters. After choosing the search filter(s) you wish to use, press the "Search" button. You will then see the following menu: "Send message", as shown on pic 28. This window contains a list of all relevant users for your chosen filter(s). After that, you can tick all the required users and move on to stating and formatting your message. The The The lower part of the OnLAN Messenger main window contains a box with auxiliary information. For example, after sending a message to Jason Smith, you will see a note: "Sent: Jason Smith". |