OnLAN Messenger Administrator Manual
Introduction
Contents and system requirements
Terminology
Installation and setup
    Loading the server
Setting up the OnLAN Monitor module
Setting up the OnLAN Server module
       License activation
Setting the database file path
Saving data to the database
Setting up the main parameters
    Loading the client
Client setup
Advanced setup
       Choosing the network interface
Registering debug information
Management tools
    Managing the OnLAN Server
Managing the OnLAN Messenger
       Control console
       Testing the server
Testing the client
Managing online users
Modifying the database
          Modifying group policies
Modifying standard groups
Modifying user registration data
Using Microsoft Access to manage the database
       Authorizing new contact creation
Managing active http-sessions
Audit tools
          Managing logs
             Event log
Command history
Message history
Unsent message log
Unsent message status log
    Managing data through the web-interface
Updating and deleting
    Updating OnLAN Messenger
       Refreshing the license
Updating the server version
Updating the client version
    Deleting OnLAN Messenger
       Deleting the client
Deleting client groups
Deleting the server
Appendix
    Event log-files
Codes in use
Ports in use
Group policy keys
Authorizing new contact creation


The OnLAN Messenger supports the option of making requests to create a new user account through the web-interface. (see OnLAN Messenger User Manual).

The list of such requests is shown in the "New users" menu (pic #15). You can access this menu by going to "Users" -> "New users" in the "OnLAN Server" window (pic #3).


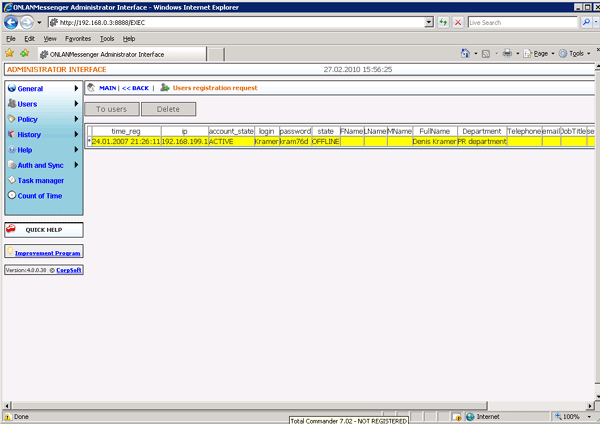
Pic #15.

The window contains all the registration information filled in by the user, as well as the time of registration. All fields can be edited.

In order to register the user in the database, press the "Register user" button. The "User_policy" policy will be applied to the user by default. Should you find it necessary, you could modify the user's registration information later, this includes the policy applicable to this user (see Modifying user registration data). The next step is loading and setting up the user's client (see Loading the client and Client setup).

Press "Delete" to delete the user's request without adding it to the database.

The "Refresh" button refreshes the list of user requests in the "New users" window.


Back         Next


Contact us


(C) Corp Soft, 2004-2010, OnLAN Messenger
All rights reserved