| Modifying user registration data |
|
After modifying the policies for standard groups (if you found that necessary), you can start modifying the user registration data. Having established a connection with the database by means of setting the path to the database file in the "DataBase" field of the "OnLAN Server" window, you can modify the data by means of the OnLAN Server tool. All modifications performed by means of OnLAN Server tool are done in the "Users" window (pic #13), which can be called from "Users" -> "Users editor" in the "OnLAN Server" window (pic #3). 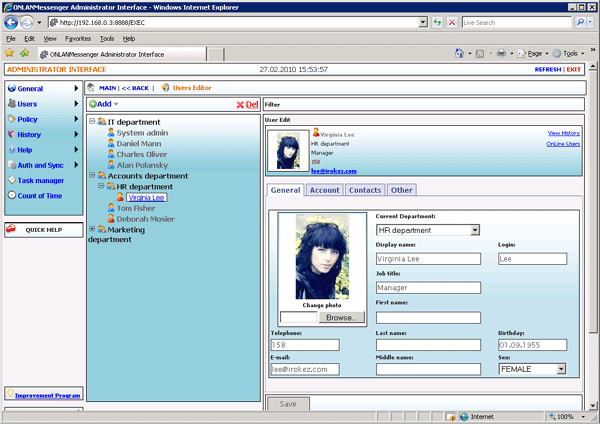 Pic #14. User registration data is displayed in the form of a table at the top of the menu. Underneath the table are the registration form fields, filled in with the selected user's data. Almost all the fields are either editable or are drop-down menus. The "ID" and "IP" fields cannot be edited. You can sort the users in the table by a designated filter, provided by the "Sort by" field. In order to setup the filter, you need to enter a combination of symbols that are present in at least one of the users' registration information fields, and press the "Filter". You can reset the filter conditions by pressing the "Clear filter" button. In order to add a new record (register an employee or organisation) you need to left-click on the user list to open the options menu and select "Add". Once done, enter the required data, while keeping in mind the following rules: - fields that are marked with a color are required for the form to be valid; - it is recommended that messenger users choose the same login name for their account as the one they use to load their OS; - for e-mail contacts (see Terminology) the login name must be entered in the following format: only_email - for invisible contacts (see Terminology) the login must be entered in the following format: no_login - the value in the "Id" field is set automatically after the new record is saved; - the "IP" field is filled in with the user's ip-address automatically. If your organisation uses dynamic IP technology for allocating IP-addresses for workstations (DHCP), then the same user can log in to the client using different IPs. This means that a new IP-address will be recorded in the user's registration data each time the user logs in. You can delete the selected record by choosing the "Delete" option in the said options menu. All changes are saved in the database after pressing the "Save" button or moving to a different record in the list. These changes will mean that all clients will receive the new contact list data, once they're logged in the next time. In order to change the contact lists for all active users immediately, you need to select "Users" -> "Send contact list to all" in the "OnLAN Server" window(pic. 3). Furthermore, note that any user can independently refresh the standard groups list by clicking the "Refresh" button in the client main menu (see OnLAN Messenger User Manual). |